Skip to content

Author: Luciano Batalha

VCSA – Certificate Status Alert triggered

Sometimes we receive alerts of expired certificates and they will check and all of them are correct, it’s time to check the backup store.

Follow the procedure:

1- Check Certificates
/usr/lib/vmware-vmafd/bin/vecs-cli entry list –store BACKUP_STORE –text

2- Backup certificate
/usr/lib/vmware-vmafd/bin/vecs-cli entry getcert –store BACKUP_STORE –alias bkp_vpxd-extension –output /certificates/bkp_vpxd-extension.crt
/usr/lib/vmware-vmafd/bin/vecs-cli entry getcert –store BACKUP_STORE –alias bkp_vpxd –output /certificates/bkp_vpxd.crt
/usr/lib/vmware-vmafd/bin/vecs-cli entry getcert –store BACKUP_STORE –alias bkp_vsphere-webclient –output /certificates/bkp_vsphere-webclient.crt
/usr/lib/vmware-vmafd/bin/vecs-cli entry getcert –store BACKUP_STORE –alias bkp_machine –output /certificates/bkp_machine.crt
/usr/lib/vmware-vmafd/bin/vecs-cli entry getcert –store BACKUP_STORE –alias bkp___MACHINE_CERT –output /certificates/bkp___MACHINE_CERT.crt

3- Delete Certificates
/usr/lib/vmware-vmafd/bin/vecs-cli entry delete –store BACKUP_STORE –alias bkp_vpxd-extension -y
/usr/lib/vmware-vmafd/bin/vecs-cli entry delete –store BACKUP_STORE –alias bkp_vpxd -y
/usr/lib/vmware-vmafd/bin/vecs-cli entry delete –store BACKUP_STORE –alias bkp_vsphere-webclient -y
/usr/lib/vmware-vmafd/bin/vecs-cli entry delete –store BACKUP_STORE –alias bkp_machine -y
/usr/lib/vmware-vmafd/bin/vecs-cli entry delete –store BACKUP_STORE –alias bkp___MACHINE_CERT -y

VMware created a script to help at https://kb.vmware.com/s/article/82560

How to Migrate Windows SRM to SRM Virtual appliance

1-  Stop the SRM Service in the Windows SRM Server

2 – Export the SRM data from Windows SRM Server

.\export-srm-data.bat <folder-name>

Example:

.\export-srm-data.bat c:\SRM-Data

3-  Deploy the Site Recovery Manager Appliance

4- Move the exported SRM data from windows SRM to SRM appliance

In Step 2, We have exported the SRM data from the SRM windows server.

    Move the exported SRM data from the window SRM server to other shared folder or file share. Once the data is moved into the shared folder or another file share, Shutdown the Windows SRM Server.

    Once the Windows SRM server is powered off, Power on the SRM appliance VM.

    Move the exported SRM data into the /home/admin directory of  VMware SRM virtual appliance using Winscp

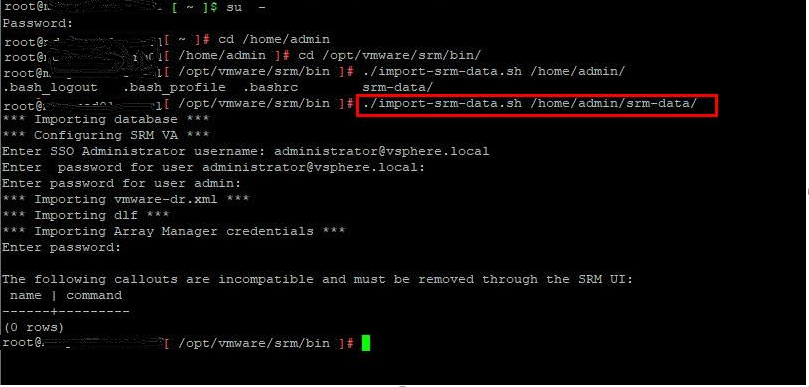
5- Log in to the SRM virtual appliance with admin credentials. Then switch it to root using the command “su-“ and specify the root password.

CD into the directory   /opt/vmware/srm/bin/

Run the below command to start importing the SRM data into SRM appliance

./import-srm-data.sh  </directory of moved SRM data>

Example

./import-srm-data.sh /home/admin/srm-data

    Enter the SSO administrator username and password.

    Enter the password for the”admin” account specified during the SRM appliance deployment.

    Enter the password to import the SRM data, which we have Set during the export process in Step 2

Migrate Windows SRM to SRM Virtual Appliance

SRM data import to SRM virtual appliance is completed successfully. If any incompatibility, it will report during the import. In our case, we don’t have any issue with the import.

6- Reconnect the SRM Pairing

Once the SRM data import is completed, we need to reconfigure the SRM pairing between the Protected and Recovery site.

Select the first site from the list. Enter the address of the Platform Services Controller for the Site Recovery Manager Server on the second site, provide the user name and password, and click Next. Select the vCenter Server and the services (Site Recovery Manager) and click Next. On the Ready to complete page, review the pairing settings, and click Finish

Configure Syslog with a non-default port on ESXi

To configure Syslog with a non-default port you need to take these steps:

Syslogserver:172.10.1.10

Port: 1530

1 – Login to ESXi by SSH

2 – vi /etc/vmware/firewall/syslogPort1530.xml

3 – Copy this text and save

<!– /etc/vmware/firewall/syslogPort1530.xml –>

<!– remote syslog configuration –>

<ConfigRoot>

  <service>

    <id>syslogPort1530</id>

    <rule id=’0000′>

      <direction>outbound</direction>

      <protocol>udp</protocol>

      <porttype>dst</porttype>

      <port>1530</port>

    </rule>

    <rule id=’0001′>

      <direction>outbound</direction>

      <protocol>tcp</protocol>

      <porttype>dst</porttype>

      <port>1530</port>

    </rule>

    <enabled>false</enabled>

    <required>false</required>

  </service>

</ConfigRoot>

4 – esxcli network firewall unload

5 – esxcli network firewall load

6 – esxcli network firewall ruleset set  -e true -r syslogPort1530

7 – esxcli network firewall ruleset set  -e false -r Syslog

8 – esxcli system syslog config set –loghost udp:// 172.10.1.10:1530

9 – esxcli system syslog reload

10 -esxcli system syslog mark -s “test log”